| Market | B2B & B2C |
| Program | Compliance |
| Campaign | Double Opt-In Process |
Campaign Goal: A double opt-in process to improve the quality of lists, increasing deliverability of messages and lowering the chances for complete opt-outs. This playbook lists the steps to set up double opt-in with Act-On.
Executive Summary
The Challenge
Double opt-in is not a legal requirement of the permission process. The Data Protection Act and the recent European GDPR (General Data Protection Regulation) require that permission (referred to in these articles in terms of consent) is a free, unambiguous and affirmative choice, and that the reason for the data collection and the possibility to opt-out must be included. However although it may not be a legal requirement, double opt-in is generally accepted as good marketing practice for certain types of inquiry, especially for digital forms of data collection.
The Impact
By using a double opt-in confirmation method, the chance of spam addresses in the deployment is greatly reduced. This means that bots that sign up for your newsletter won’t make it onto your list, helping you avoid any spam traps and protecting your sender reputation.
Additionally, since this is an added step for the user, it shows an increased level of interest in the business or topic, leading to greater engagement and ultimately better results for your email marketing strategy.
How to Build This Campaign
Included Assets:
- Primary List that will store all opt-in and double opt-in data.
- A form that collects opt-ins in order to update your Primary List.
- A segment to identify contacts who have opted in once and need to receive a Double Opt-In Email.
- An Automated Program to:
- Send an email that links to a landing page for confirmation
- Populate a segment of contacts who’ve confirmed their double opt-in
- Update your Primary List to track single and double opt-ins
Step 1: Primary List Opt-In & Double Opt-In Fields
Create a Primary List with all of your existing contacts and add ‘Opt-In’ and ‘Double Opt-In’ fields (or modify your existing Primary List to include these fields)
Step 2: Configure Your Opt-In Form
Create your new opt-in form or modify existing forms to include an opt-in field. These forms should write to your Primary List and either embedded on your webpage or Act-On Landing Pages. Finally, map your opt-in checkbox to write ‘True’ to the ‘Opt-In’ column when selected by the user.
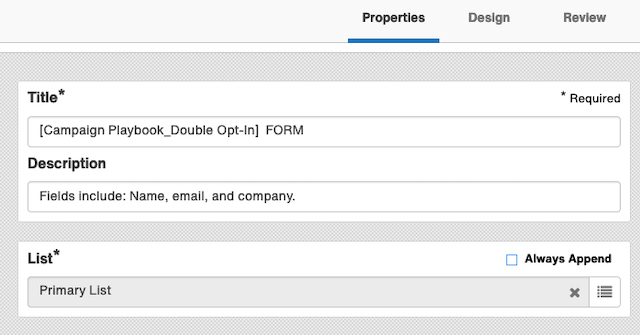
Below are screenshots of a final opt-in form and the configurations of the "Opt-in" field.
Form Properties: Write submissions to Primary List

Opt-In Field Mapping:
Video Walk-through:
Best Practices:
- Every form should include an opt-in field so that everyone who is added to your list to go through the double opt-in process.
- Enable prefill on any opt-in Form so that visitors know what value, if any, they’ve already selected in previously submitted forms.
- Include a Google ReCaptcha on your forms to prevent bot submissions
Note: This Campaign Playbook will send a confirmation message via an Automated Program to visitors who opt-in. If your forms send a confirmation email, visitors completing the form will receive multiple messages.
Step 3: Create a Double Opt-In Confirmation Landing Page
Create a Landing Page for visitors to be sent to once they’ve confirmed their opt-in. This page should include language to let the customer know they’ve successfully opted in.
Step 4: Build A Double Opt-In Confirmation Email
Create an Email Message which will request users confirm their opt-in. Be sure to include a clear call to action in the form of a button that links to the Landing Page you created in the last step.
Video Walk-through:
Step 5: Build Opt-In Segment
Create an ‘Opt-In’ segment from your Primary List based on the following criteria:
- Behavior: Has submitted at least one of the opt-in Forms (select all that apply)
- Profile: ‘Opt-In’ equals ‘True’
- Profile: ‘Double Opt-In’ does not equal ‘True’
Step 6: Build Double Opt-In Segment
Create a ‘Double Opt-In’ sub-segment of your Opt-In segment based on the following criteria:
- Behavior: Has clicked on the opt-in confirmation Message
- Behavior: Has visited the opt-in confirmation Landing Page
Video Walk-through:
Step 7: Create Your Double Opt-In Confirmation Automated Program
Create a new Automated Program
- Add your Primary List under Source List
- Set your program to Run Immediately so that it will be triggered as soon as a new visitor opt-in enters
- Add your opt-in confirmation message template under Program Messages
- Add your Opt-In and Double Opt-In segments under Lists & Segments
- Add the following program steps under Program Flow
- Wait Until In
a. Select your Opt-In segment - Send Email
a. Select your opt-in confirmation Message template - Wait Until In
a. Select your Double Opt-In segment
b. Set the program to check at Specific Times Every Day & Every Hour - Change Field
a. Set the value of the Double Opt-In field of your Primary List to “True”
- Wait Until In
- Select ‘Done’ to save your program then ‘Start Program’ from the Actions menu of the Overview page
Video Walk-through:
NOTE: If you have separate form submissions lists for your forms, create a List Maintenance Programs to add your submissions to your Primary List and follow the steps/process above.